This article is the third in a series which covers Polycom’s RealConnect service, a Microsoft Azure-based video interoperability service for Skype for Business and Microsoft Teams meetings.
RealConnect Service for Skype and Teams – introduces the overall solution and the steps to activate the service for use with Skype for Business Online meetings and/or Teams meetings. (A future article will cover the additional configuration steps required to support Skype for Business Server or Hybrid deployments with the service.)
Polycom One Touch Dial Service – explains what this ancillary service is, how it works, and provides detailed configuration steps for using it with Polycom VTCs. (A future article will cover the configuration for Cisco VTCs.)
Polycom Cloud Relay – outlines the purpose of this component, how it works, and then walks through the steps for deploying a Cloud Relay virtual server on-premises. This on-premises server is an optional component to the RealConnect service, only needing to be deployed when using Skype for Business Server and/or supporting Cisco endpoints with the One Touch Dial service.
The Polycom Cloud Relay is a relatively new component which was born out of the need to provide a lightweight server to handle various supportive tasks for multiple cloud services needs. Essentially, when moving a solution or workflow from an on-premises server into a hosted service across the public Internet some capabilities may not be able to function entirely in the cloud. To address this sometimes an on-premises relay may be required to facilitate some forms of communication.
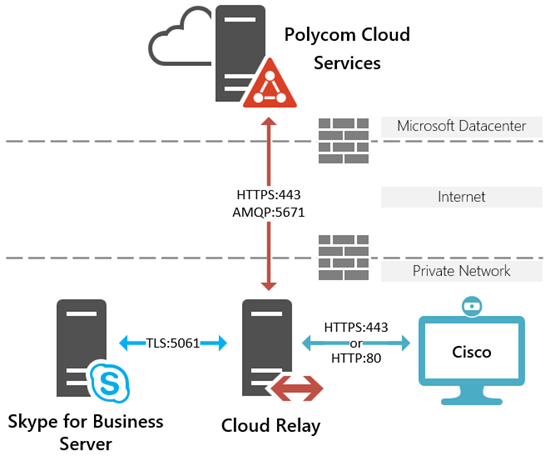
This server’s primary function is to sit inside enterprise firewalls and open secure outbound connections to various Polycom services running in Microsoft Azure datacenters, meanwhile relaying messages from the cloud over to certain local resources. The Cloud Relay thus must sit on the private internal network like most other internal servers and not in a perimeter network to perform its duties. This component is a lightweight virtual machine based on Cent OS which is provided free of charge to Polycom customers in both VMware (.OVA) and HyperV (.VHD) formats. By itself the server is useless as it must be paired with a customer tenant utilizing one or more licensed Polycom services.
Background
Understand that the Cloud Relay in and of itself really does nothing other than ‘phone home’ and wait for instructions. When it is first brought online and configured on the local network it will then immediately attempt to connect to a handful of hardcoded Fully Qualified Domain Names (FQDNs) which point to several services running across multiple Azure datacenters. If these connections are successfully established then the new relay will then sit indefinitely in a holding pen, waiting to be manually integrated into a specific Polycom cloud tenant. Once this pairing step is completed by an administrator then the correct relay will be permanently linked to that tenant and begin pulling down any provisioned services which have already configured in the tenant. This includes the automatic download of any apps associated to the configuration, which are essentially docked into the Cloud Relay.
So in short, this relay is something that is simply brought online the first time using the local console and then from that point forward all management and configuration is performed through the appropriate Polycom cloud portal. Configuration changes and even software updates to the individual apps are all automatic. Currently the Cloud Relay itself is not updated so when new versions of the server image are released it would require the deployment of a new image, or replacement of the existing. But the majority of the various Polycom service offering’s features and functionality comes from the individual apps which are automatically updated as stated.
Once these apps have been pushed down to the relay then it can start to perform its duties, whatever those may be. Currently the Cloud Relay is used to perform several functions, most of which are applicable to the RealConnect service, but not all. For example the Polycom Device Management Service (PDMS) cloud offering leverages the Cloud Relay for some optional device management capabilities. But as this series of CVI articles is focused on the RealConnect service then the two applicable roles that the Cloud Relay serves is:
- To relay meeting invitations originating from Exchange Online or Exchange Server resource mailboxes that the Polycom One Touch Dial service needs to process and deliver to Cisco endpoints. Obviously if a Cisco VTC is sitting on an internal private network then it would not be possible to open a connection from the cloud directly to that endpoint without establishing a 1:1 static NAT through a corporate firewall, which is a poor and an unused practice. So the Cloud Relay is used to receive that invitation from the cloud service and then establish a local connection directly to the Cisco endpoint to relay the message.
- To relay signaling messages from the Polycom RealConnect service to an on-premises Skype for Business Front End Server/Pool to establish the required connectivity to support RealConnect meetings in the cloud. This communications path is used by the cloud service to identify and locate the proper Skype Meeting URI for a given scheduled Skype meeting. The cloud service will then establish a media cascade to the meeting running on the Skype for Business Server through the normal media route via the Skype Edge Server/Pool. Note that the Cloud Relay only relays signaling, absolutely no media traverses the relay so the processing and bandwidth requirements are very little.
For high-availability and redundancy multiple relays can be deployed and integrated with the same tenant. The majority of communications are from the cloud to the relay so resiliency is inherent and failover is automatic as the service will communicate to all available relays. For the few scenarios where any messages originate from a customer’s network the redundancy behavior can be controlled by the local configurations options like Round Robin DNS, Geo-DNS, or DNS Load Balancing.
Workflow
While the Cloud Relay is handling multiple functions the main portion of its communications are always the same. It will attempt to securely open several outbound connections to Polycom services in Azure, all over two ports: 443 and 5671. In many environments outbound access to the Internet over 443 is open from any trusted network to untrusted networks and the majority of the traffic transverses here. But the less-common Advanced Messaging Queueing Protocol (AMQP) traffic leveraged by the Microsoft Azure Service Bus over port 5671 can often be blocked by corporate firewalls and will need to be allowed outbound.
Communications from the Cloud Relay to the various Polycom Services are based on establishing secure connections to hardcoded FQDNs which, based on geography, will be directed to the nearest Azure datacenter where the services happen to be resident.
As outlined in the official documentation the Cloud Relay will resolve and then attempt to connect to the following FQDNs via TCP over port 443:
- api-global.plcm.cloud
- api-orion.plcm.cloud
- iot.plcm.cloud
- logging.plcm.vc
- servicebus.plcm.vc
- polycom-nimbus.servicebus.windows.net
- aquadevacr-plcm365.azurecr.io
- *.blob.core.windows.net
Additionally the Cloud Relay will need to establish connectivity to the Azure Service Bus via TCP over port 5671:
- servicebus.plcm.vc
- polycom-nimbus.servicebus.windows.net
All of these connections are established outbound and no ports need to be opened for inbound connections. (The official documentation does reference opening TCP 22 inbound from the Internet but that is only for remote SSH connectivity in the event that Polycom support needs to connect directly to the Cloud Relay console during a support call. Do not actually open this port during deployment.)
The role of the Cloud Relay is to provide a two-way communication path with the cloud services by opening the outbound connection and then keeping that connection open for the cloud to send information down as needed. In the event that outbound connections to the Internet are limited by firewall policy then there are two configuration options typically leveraged. Firstly the FQDNs above can be entered into firewall policies to allow the outbound traffic. But often domain names are not allowed in firewall policies and only IP addresses and subnetworks may be allowed via defined IT policies. As service in Azure can sometimes change IP address or subnetworks it is recommended to subscribe to service alerts in the case that any IP addresses will be changed in future upgrades or maintenance routines.
With the prerequisite communications to the cloud successfully established the Cloud Relay will download the configuration and apps needed to further establish local communications with any on-premises Skype for Business Servers, Cisco VTCs, or (in the case of PDMS) Polycom IP phones like the VVX and Trio.
- For communications with a Skype for Business Front End Server/Pool the Cloud Relay will need to be able to open a connection over TLS 5061 using an assigned server certificate . The additional configuration for this outside of the prerequisite Cloud Relay deployment is covered in a separate article in this series, which is mentioned at the top of this article.
- For communications with a Cisco VTC the Cloud Relay will need to be able to open a connection to the Cisco device over port 443 (or 80). This additional configuration is also provided in a separate article describe at the start of this article.
The remainder of this article will walk through the deployment of a single Cloud Relay into an existing VMware ESXi server.
Management Portal
Before attempting to deploy the Cloud Relay it is necessary to access the associated Polycom management portal, if that has not already been done. This article assumes that the portal has not yet been accessed for the tenant, so if it already has then simply skip to the next section.
The Cloud Relay is managed inside of the Polycom Cloud Service Administration portal which is a web portal hosted in Azure. After purchasing licenses or requesting a trial license the administrative contact email provided in the order will have automatically been sent two emails. One email includes the license number for the order (which was covered in this article) and the other email includes instructions to activate the account’s access to the management portal.
- Locate the email originally sent by cloud-service-team@polycom.com entitled “Welcome to Polycom Cloud Service Administration”.
- Click the Activate Your Account button in the body of the email.
Unless this link is utilized shortly after first receiving the email the invitation will likely have expired by now. If that is the case this connection attempt will have triggered a new automated email to be sent with a fresh activation link, as explained in the following screenshot.
- Return to the same account’s mailbox and look for a new email from the same sender and with the same subject line. Click the Activate Your Account link in this new message.
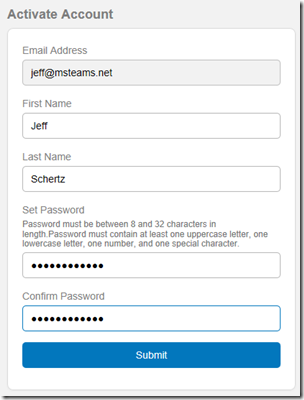
- This time the Activate Account screen should appear asking to define a password for this account. Enter the name associated with the email address, create a new password, and then click Submit.
This has created a new Enterprise administrator account locally within the Polycom management portal’s database. It is recommended to add at least one additional administrator account, but instead of creating more local accounts it is recommended to enable authentication with Office 365.
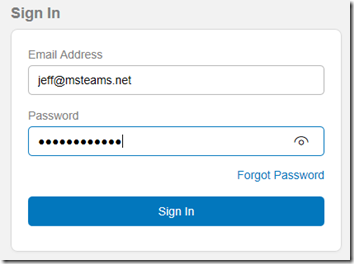
- Enter the new password which was just created and click Sign In.
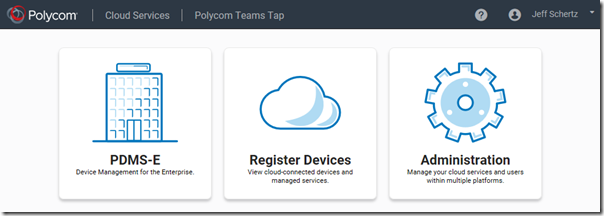
- Select the Administration section at the portal’s home screen.
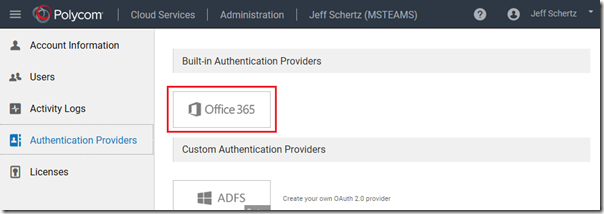
- From the navigation menu select Authentication Providers and then click the Office 365 option under Built-In Authentication Providers.
- Click Enable under the Create Provider section.
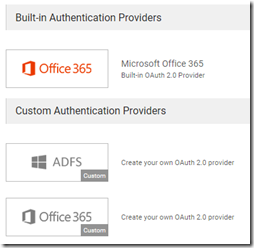
The Office 365 option will now be shown in color to indicate that it has been enabled.
- From the navigation menu select Users.
Note that the current administrator’s Sign In Account is shown as “Enterprise and Local”. This indicates that if that local account matches the User Principal Name of a valid Office 365 account then that account can also be used now to sign into the portal. Essentially there are two separate accounts with the same name available to use: one that is stored in the service’s own database (Local) and one that is available via Office 365 authentication (Enterprise). This is important to understand that if the two accounts have the same password then signing into the portal may seem transparent, but if different passwords are used then it could be confusing. This is why it is recommended to simply use Office 365 authentication from this point forward, both for the original account and any others which are added.
The following steps are optional and can be skipped over if adding a second administrator account is not desired.
- Click Add to add another existing Office 365 account in the tenant as an administrator.
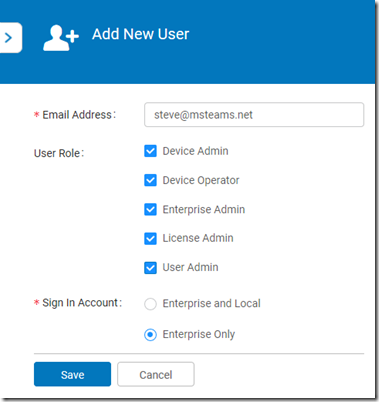
- Enter the desired user’s User Principal Name (e.g. steve@msteams.net) and select the appropriate User Role options. Having a spare full administrator account is recommended, so select all roles, but leave the Sign In Account set to Enterprise Only and then click Save.
At this point access to the management portal has been enabled and secured. After deploying the Cloud Relay server this portal will be used again to complete the configuration.
Deploy Cloud Relay
The next series of steps will include downloading the Cloud Relay software from the Polycom Support site, importing the virtual machine in ESXi, and then configuring the Cloud Relay. As mentioned earlier this Cloud Relay will be setup on a VMware ESXi server, but these steps may differ based on the virtual server platform and version. As this section will be familiar to anyone accustomed to managing virtual server systems then the directions in this section will be brief.
Download Software
- Go to the Polycom Cloud Relay support page and download the current version of the desired software (e.g. OVA Image for HyperV).
- Save the file locally on the same workstation where the ESXi management console will be opened.
Import Virtual Machine
- Connect to the ESXi server using the web management console and sign in.
- Select Virtual Machines from the Navigator and then click Create/Register VM.
- Select the option to Deploy a virtual Machine from an OVF or OVA file.
- Enter a name for the virtual machine (e.g. CloudRelay1) and then click the select files option and locate the .OVA file previously downloaded to the local computer (e.g. polycom-cloud-relay-1.1.2-64805.ova).
- Select the desired Datastore, Network Mapping, and Disk Provisioning options.
- Review the selections and then click Finish to start the process of uploading the OVA file and establishing the virtual machine.
Configure Virtual Machine
- Once the import process has completed successfully select the new virtual machine in the management console and verify that it has been started. If not, start the VM.
- Open the Console and then login into the Cloud Relay using the default username ‘polycom‘ and password ‘polycom‘.
The OS will require that a new password is created. Pay close attention to the prompts as the existing password will be requested again before asking for the new password.
- Re-enter the default password of ‘polycom‘ one more time and then enter a new password and confirm the new password.
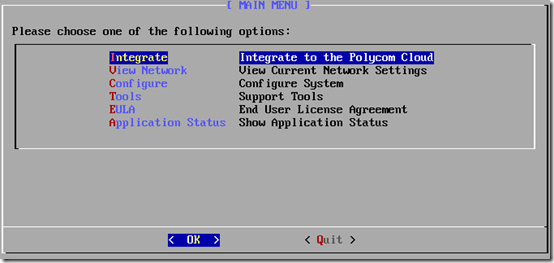
- Accept the End User License Agreement to advance to the management console’s main menu.
- Select the Configure menu.
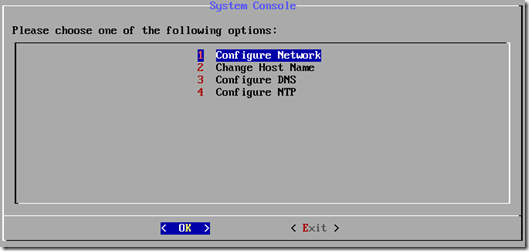
- Choose the Configure Network menu and then select the eth0 interface.
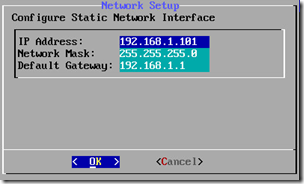
- Select Static address setup and then enter the appropriate IP Address, Network Mask, and Default Gateway and then select OK.
- Once the network server finishes restarting verify the correct settings are displayed onscreen and then select Change Host Name and enter the desired host name for the Cloud Relay (e.g. cloudrelay1).
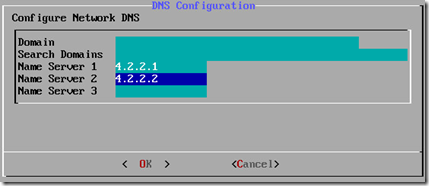
- Select Configure DNS and enter the appropriate DNS settings for the local network.
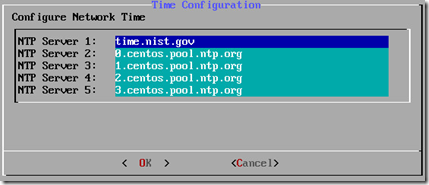
- Select Configure NTP and enter the appropriate NTP settings for the local network.
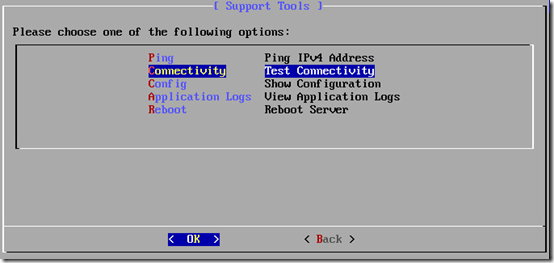
- Exit to the main menu and select Tools.
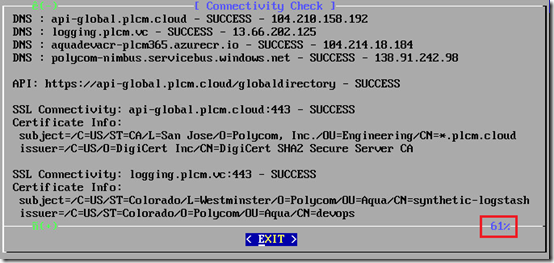
- Select the Connectivity option.
- Review the connectivity test results to verify that each individual test results in a SUCCESS status and no errors are reported.
Note that the 61% value shown in the screenshot above does not mean that only 61% of the tests passed successfully. This is simply the ASCII interface indicating that only 61% of the results are currently shown on the screen.
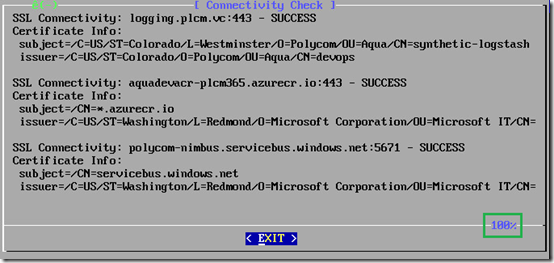
- Use the down-arrow to scroll through the remainder of the results.
As mentioned earlier in the article pass special attention to the last connectivity check to the service bus (polycom-nimbus.servicebus.windows.net) over port 5671 which might be blocked by a firewall. If all tests have passed successfully then move on to the next step, otherwise check any local DNS configuration or firewall policies to resolve any outbound connectivity issues to the Azure datacenter.
Integrate Cloud Relay
-
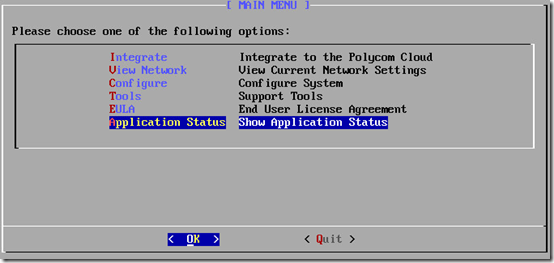
- Return to the main menu and select the Integrate option.
The cloud connector services will be started and then a Registration Code will be displayed on the screen. Record this code and play close attention as due to the console font the zeros (0) and eights (8) can look similar. For example, the following code is 03777724 but at first glance almost appears to start with an 8.
- Record the code displayed above and then return to the Polycom Cloud Service Administration portal (http://console.plcm.cloud).
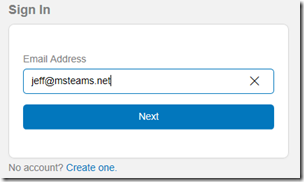
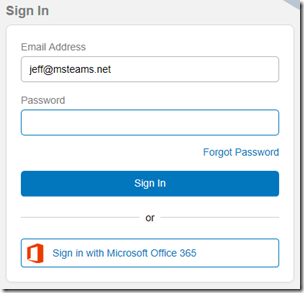
- Enter the administrator account name and then click Next.
Because the Office 365 authentication integration was configured in the first section of this article there is now a new sign-in option available.
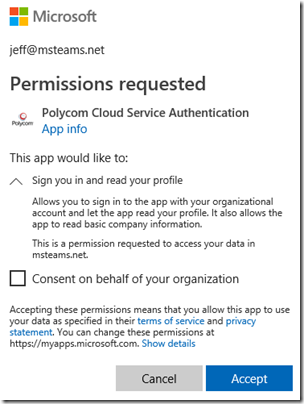
- Click the Sign in with Microsoft Office 365 button and, if prompted, select Accept on the permissions request from Polycom Cloud Service Authentication app.
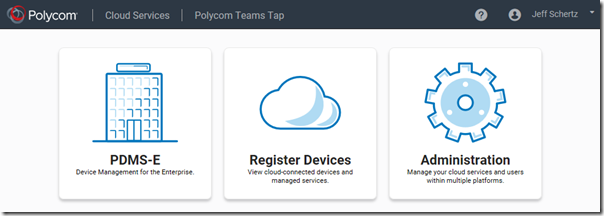
- Select the Register Devices section.
- Select the Cloud Relay option and then click Add.
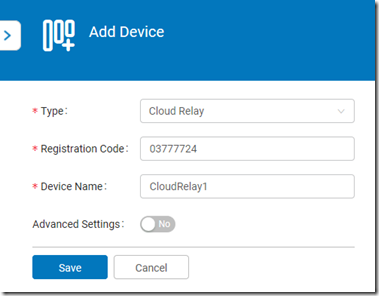
- In the Registration Code field enter the code provided by the Cloud Relay in the earlier step (e.g. 03777724) and then enter the Device Name (e.g. CloudRelay1) and then click Save.
The Cloud Relay should now appear in the list, but notice that the Status icon will initially be displayed in gray.
Wait for a few second and if the deployment was performed correctly then the status should automatically update to a green icon to indicate a successful pairing of the Cloud Relay to this tenant.
- Return to the Cloud Relay console and select the Application Status option from the main menu.
At this point the individual components should all be listed as running with no errors reported.
Additionally the Tools > Application Logs menu can be used to view diagnostic logs for the various components.
Now that a Cloud Relay has successfully been deployed any additional configuration to support One Touch Dial for Cisco endpoints or RealConnect with Skype for Business Server can be completed.















[…] Polycom Cloud Relay – outlines the purpose of this component, how it works, and then walks through the steps for deploying a Cloud Relay virtual server on-premises. This on-premises server is an optional component to the RealConnect service, only needing to be deployed when using Skype for Business Server and/or supporting Cisco endpoints with the One Touch Dial service. […]
[…] Cloud Relay (CR) is similar to the Workflow Server except that is a lightweight, freely available virtual server image which, once imported into a VMware or Hyper-V host, is used to connect to Polycom and/or Microsoft services in Azure. This server can be utilized for multiple capabilities in RealConnect alone, as well as for other Polycom services, like some endpoint management tasks unrelated to RealConnect. For the purpose of RealConnect for Clariti though it is used to house a Microsoft SIP adapter which handles signaling communications between the DMA/RMX/CCS components and Skype for Business Online. […]
Hi Jeff,
When I run the Test Connectivity, it fails here: “SSL Connectivity: logging.plcm.vc:443 – Failure”. Everything else is Success.
Is there something wrong on Polycom’s end?
Daniel, I’ve never seen only one test fail unless that target FQDN was being blocked (e.g. not explicitly opened). Also the solution will still function fine if the logging FQDN is not reachable, Poly simply will not have any of your CR log data in the event you open a support ticket.
Hi Jeff,
Hope you can help me. I have set up the Cloud Relay and configure the PDMS-E and linked the Cloud Relay. Now I’m stuck at the Certificate part: https://cloud-relay-docs.plcm.vc/docs/install-cert
How do I export this PFX certificate?
This entirely depends on where you’ve request/created the certificate from. The PFX will need to contain the issued certificate, its private key, and the issuing CA’s chain of public keys.
Hi Jeff, We have recently completed a direct RealConnect OnPrem to Microsoft Online with the Relay Server. One of the drawbacks is that the RealConnect cascade to Microsoft is considered a Guest and shows up in the meeting as a Guest rather than a Trusted Presenter. Are there any plans to resolve this so the Polycom OnPrem to Microsoft Online connection within tenants allow the RealConnect cascade to join the meeting as a Presenter without the need to escalate the connection manually or through the Skype Meeting Options? Thanks.
That is by design as the only way the RealConnect cascade can be established into Skype for Business Online meetings is as a ‘guest’. The Trusted Application model used in a direct integration with Skype for Business Server is not available with Skype for Business Online.
Hello Jeff
Have you ever run into a situation where the registration code does not show when you choose “integrate” while using the Hyper-V Version of the Cloud Relay ?
I have not, but most of my testing has been on VMware servers. Suggest contacting support for assistance if you’ve already tried deleting and re-importing the CR image.
I have the same issue (tried different versions but all the same result) did you manage to fix this?
Thanks for this docs, does the Cloud Relay support proxy?
Not currently. You’ll need to define rules in the firewall to allow the required outbound traffic from the CR out to Azure.
Jeff, it is quite surprising that a software that is supposed to be deployed in a data-center would not support proxy and would require opening up a firewall based on IP names. Our firewall is configured by IP address. How do you configure a firewall for *.core.windows.net ?
Is there a plan to add support for proxy in a future release?
Proxy support is being investigated, but I’m working on getting updated guidance for using specific Azure subnets instead of FQDNs. The wildcard is a newer addition due to how the container registries function in Azure: https://docs.microsoft.com/bs-cyrl-ba/azure/container-registry/container-registry-firewall-access-rules
[…] Polycom Cloud Relay – outlines the purpose of this component, how it works, and then walks through the steps for deploying a Cloud Relay virtual server on-premises. This on-premises server is an optional component to the RealConnect service, only needing to be deployed when using Skype for Business Server and/or supporting Cisco endpoints with the One Touch Dial service. […]
In my realconnect setup 5.1.. I am facing AVMCU cascade link redial issue after every 2-3 minutes.. I am not sure if there is something wrong with configuration but as AVMCU connection is good for few minutes.. I am expecting it to be Rmx issue
Please open a support ticket on this as that is not the expected behavior.