The latest release of the Polycom VVX 5.5.1 UCS firmware is now available for Lync and Skype for Business (SfB) environments. While the initial 5.5.0 release was published a number of months ago that was only intended for Open SIP applications and was not yet supported for Lync/SfB use.
With this release comes a large number of anticipated features and improvements related to Skype for Business. For additional assistance with updating phones the following articles are provided as references.
Perform a Factory Reset – This is an optional, but recommended step when working with individual test devices for validating new firmware in an established deployment.
Deploy Software – Once testing is complete then this firmware can be added to the Lync or Skype for Business Device Update service for on-premises deployments.
Online Updates – For Skype for Business Online customers this update automatically be published once it has passed qualification. Use this article to control this behavior if automatic updates are not desired.
Upgrading a Phone
This section will cover the basic steps to upgrade a single phone using the Polycom-hosted public server to directly download and apply the firmware to the phone. In order to perform this process the phone’s internal web server must be enabled. Depending on the selected Base Profile the web server may need to be manually enabled.
Set Base Profile
As explained in many earlier VVX articles the phone must be set to the proper Base Profile when registering to various SIP platforms. Depending on the original purchasing SKU and/or current status of the phone it will be set to one of two options by default: Generic or Lync. (Note that “Lync” base profile has been renamed to “Skype” in version 5.5.1, but they function the same.) When a VVX phone is set to Generic then the Web Configuration Utility will be enabled by default, but as this phone is or will be used with Lync/SfB environments it is best to set or confirm this parameter before doing anything else.
- From any screen simply depress and hold the the following Multiple Key Combo (MKC) of: 1, 4, 9.
- When prompted after 3 seconds enter the Admin password. (The default is “456”).
- If the current value is set to Generic then select Lync and the phone will immediately reboot. If Lync is already selected then simply hit the Home button to exit the menu.
Enable Web Configuration Utility
Back when UCS 5.3 was released a new default behavior was defined for the Lync base profile which automatically disabled the embedded web server. This can be re-enabled on the VVX phone for testing or administration purposes if so desired. To perform many of the steps in this article it must be enabled now.
- Press the Home key and navigate to the following menu: Settings > Advanced > Administration Settings > Web Server Configuration.
- If not already configured then the Web Server parameter to Enabled and Web Config Mode to HTTP/HTTPS. (If a secure connection is required then set this to HTTPS Only).
- Select the back arrow and choose Save Config to apply the changes and reboot the phone.
- After the phone has rebooted press and hold (for 3 seconds) the following keys: 1, 4, 7. This handy MKC brings up the Phone Details menu which can be used to quickly find useful information like the device’s assigned IP address or current firmware version.
- Using a web browser connect to the IP address of the phone. (e.g. https://192.168.0.201).
- Enter the Admin password (default is “456”) and verify that the Home page successfully loads.
Update Firmware
This phone must have access to the Internet in order to connect to the public hosted Polycom update server and perform the update described in this section.
- Using the Web Configuration Utility browse to the Utilities > Software Upgrade menu and make sure that Polycom Hosted Server is selected as the Server Type.
- Click Check for Updates which should be followed by a response of “Successfully fetched available software from the Polycom Hosted server.”
- Select the desired firmware version number (e.g. 5.5.1.11526) and then click Install. The currently installed version will be displayed in blue with older versions in red and newer versions in green.
- Confirm the action to reboot the phone and trigger the update. Once the phone completes the update process it will return to whatever registration state it was in before the update.
The following sections covers enhancements to the phone user’s experience, like new authentication methods, call transfer workflow changes, group expansion, and device locking behavior to name a few.
Sign In Options
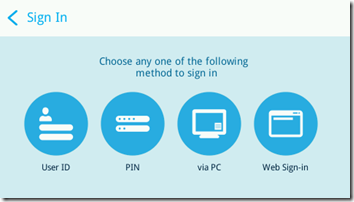
If the updated phone was factory-reset or did not currently have a Lync or Skype for Business user registered then the first screen that will appear after startup is complete will be the following new Sign In window providing up to four unique authentication options.
User ID
The User ID option brings up the User Credentials screen for the traditional registration process requiring appropriate user credentials. This process remains unchanged and guidance provided among previous articles covering registration to on-premises or online platforms is still applicable.
PIN
The PIN option brings up the PIN Authentication screen which requires the user to enter their phone number or extension and their PIN. This process can only be used with on-premises Lync/SfB deployments as it requires the configuration of DHCP Options 43 and 120 on the local network.
If the PIN authentication option does not appear on the main Sign In window then this would typically indicate that the prerequisite DHCP configuration is not in place and/or the STS-URI override option is not configured on the phone. If PIN authentication is in fact configured correctly in the network then try canceling the Sign In window and then reselecting the Sign In soft-key from the main menu. When the window initially appears after the phone has been powered on or rebooted it may still be attempting to locate the required server and sometimes delays in time synchronization can cause this.
via PC
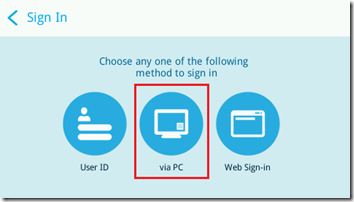
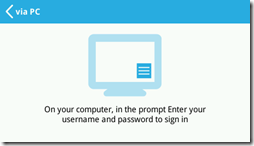
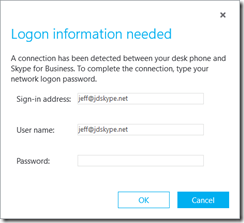
The via PC option will only appear when the phone has already successfully established a Better Together over Ethernet (BToE) pairing connection to a Windows PC by way of the Polycom BToE Connector application. This Automatic pairing functions the same as in previous releases but UCS 5.5.1 now includes a new Manual pairing mode which is covered in a later section of this article. Selecting this option triggers a sign-in window to appear on the connected PC’s Skype for Business client.
Web Sign-In
The new Web Sign-in process can only be used for Microsoft Office 365 Skype for Business Online users. Lync/SfB users accounts homed on an on-premises server, even in Hybrid models, cannot be used. Currently this new capability is only for Microsoft cloud user accounts.
The following steps walk through using the new Web Sign-in process for online users.
- Select the Web Sign-in option to advance through the new external authentication process which requires no additional interaction on the phone itself. This will bring up the following screen with instructions to visit a Microsoft website on a computer and then enter a unique code.
- Using a web browser on a separate computer go to http://aka.ms/sphone and then enter your Skype for Business Online user username.
- After being redirected to Office 365 enter the password for this account and then select Sign In.
- Another redirection will occur to the Device Login page. Enter the alphanumeric code that is currently being displayed on the phone’s screen (e.g. EADVJB5J3). Note that while the code is displayed in all capital letters it is not actually case-sensitive and can be entered in either upper or lower case characters..
Once the code is accurately entered it should immediately update to show the type of device being used, in this case a “Polycom Skype for Business Certified Phone”.
- Select Continue and then, if prompted, select your desired account from the menu. The page will report that the process is complete and the window can be closed.
- Meanwhile the phone should now have automatically advanced to the sign-in process as seen below.
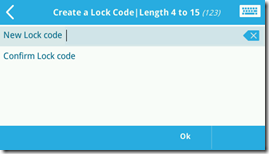
Once the process is complete the phone will prompt to create a device lock code. This must be created and cannot be skipped, although this new behavior can be disabled which is covered in more detail later on in this article.
- Enter the desired unlock code (e.g. 123456) and then tap the arrow in the lower-right corner. Repeat these steps to validate the new unlock code.
Once registration is successful the standard home screen will display along with pinned Favorites.
To summarize, the User ID and via PC modes can be used for any Lync/SfB account on-premises or online. Yet the PIN method is only for on-premises deployments and the Web Sign-in model is only for online users.
Updated 5/12/2017: As of the latest 5.5.2 firmware release the Web Sign-In option can now be hidden via the new feature.webSignIn.enabled configuration parameter. This parameter is enabled by default (feature.webSignIn.enabled=“1”) but can be disabled by manually setting the value to “0”. That will hide the option from the main Sign In screen, which is recommended for on-premises deployments where this sign in model cannot be used.
Updated User Interface
At this point the screenshots above clearly show an updated interface more closely matching the color and iconography of the various Microsoft Skype for Business clients. Note that only the VVX 500 and VVX 600 series support this refreshed look. The VVX 200/300/400 series phones are thus far unchanged from the previous user interface when in Skype Base Profile. All other new features and capabilities covered throughout this article still apply to all VVX models.
Here are a few additional screens highlighting the new, cleaner interface.
With this new release the previously entitled Lync Base Profile option has been renamed to Skype. Understand that this really means Skype for Business and these phones cannot be used natively with the Skype consumer platform. Also Lync Server environments are still supported so renaming this profile does not impact UCS support or functionality with existing Lync deployments. This is purely a cosmetic change.
Device Locking
While VVX phones have long supported locking the phone interfaces down this was handled out-of band from Lync/SfB and required additional phone-side configuration. But now the VVX can leverage the existing device locking capability that was introduced in Lync Server 2010 for Lync Phone Edition devices.
A provisioned phone will automatically lock the interface after powering-up and registering with cached credentials as well as after 10 minutes of inactivity by default. This behavior is identical in Lync Phone Edition devices.
- When the screen is locked simply tap the opened padlock icon in the lower right corner and then enter the same device lock code which was created during the original user login process.
The phone can be manually locked by selecting the Lock option from the Home menu.
There is also a new menu located under Settings > Basic > Device Lock which can be used to either lock the phone immediately or to change the device lock code. The current code will be needed to change it.
If the VVX phone is actively paired to a Windows PC using the BToE application then it will also automatically lock and unlock when the Windows PC is locked or unlocked, just like LPE devices always have when they were USB tethered.
If only VVX phones have been used in a Lync Server, Skype for Business Server, or Skype for Business Online deployment, with no Lync Phone Edition devices, then this default device locking behavior would never have actually been experienced. Being forced to create a device PIN during the first successful registration after updating to 5.5.1 (as shown in the process above) may not be a desirable user experience in some environments. Nor may be the basic behavior of having the phones automatically locking after the default timeout interval of 10 minutes.
This previous article explains how to either disable or modify this locking behavior natively within Lync Server, and those steps are still applicable to Skype for Business Server. But for Skype for Business Online tenants it is not currently possible to perform the same customization in the Office 365 administration portal. Another more recent article outlines the few currently available parameters for controlling IP phone behavior directly from within SfB Online. Unfortunately the options to disable device lock or control the timeout and device PIN complexity rules are not included.
Thus the traditional UCS provisioning model can be used to disable this device locking feature directly on the phone. As with all other UCS configuration parameters these can be applied manually on the phone, or automatically using the standard provisioning server model or via enhanced third-party solutions like UC Commander, for example.
To disable this manually on a single VVX phone the Web Configuration Utility can be used to import a basic configuration file with the defined parameter.
- Create a new file in any standard text editor (e.g. Notepad) and then copy/paste the following text.
<?xml version=”1.0″ encoding=”utf-8″ standalone=”yes”?>
< PARAMETERS feature.deviceLock.enable=”0″ />
- Save the file with a .CFG extension (e.g. DisableDeviceLock.cfg).
- Access the Web Configuration Utility using the VVX phone’s IP address and then sign in with the Admin account password (the default password is “456”).
- Browse to the Utilities > Import & Export Configuration menu and expand the Import Configuration section, if it is not already.
- Click Choose File and then locate and select the configuration file created in the first step.
-
- Click Import to apply the configuration to the phone, triggering an immediate reboot.
After the reboot is complete it will automatically go to the standard home screen and no longer ask for a PIN to unlock the phone.
To re-enable the device locking behavior simply either perform a factory reset or use the same process above but first change the configuration parameter value from ‘0’ to ‘1’. (e.g. feature.deviceLock.enable=”1″). Ideally just create a copy of the configuration file and change the name to something like “EnableDeviceLock.cfg” to make it easy to switch the phone back and forth.
Although enabling and disabling the device lock capability is the only configurable UCS parameter in this release the phone will still adhere to a few additional in-band settings. Both Lync Server and Skype for Business Server allow administrators the ability to modify not just whether device locking is turned on or off, but also to control the length of the device unlock PIN and the interval of idle time reached before locking the phone.
The PhoneLockTimeout and MinPhonePinLength parameters are configurable via either the Control Panel or Management Shell for on-premises server deployments only. Any VVX phones running UCS 5.5.1 will adhere to the customized values of these Lync/SfB parameters.
Get-CsUCPhoneConfiguration
In the example above the device lock remains enabled but the default 6-digit PN requirement was reduced to 4 digits and default timeout value of 10 minutes was increased to 30 minutes. (Note that while the server will allow a timeout value to be set as low as 1 second on the policy the VVX itself will ignore values below 60 seconds as that is the shortest amount of time allowed before the phone will invoke the lock screen.)
In summary the new behavior here is that UCS will adhere to server-side configuration of device lock state, timeout, and PIN length just like a Lync Phone Edition device always has. This server configuration for these features is only available to administrators of on-premises Lync/Skype deployments and cannot currently be managed on Skype for Business Online accounts. Thus the only option for Office 365 hosted accounts is to disable the feature altogether using the phone-side parameter shown in this section; the timeout and PIN length are not currently customizable for these online tenants.
Call Transfer
In UCS 5.5.1 the call transfer behavior has changed in two ways, with one alteration being hardcoded and the other controllable through a new configuration parameter.
Unchanged is the default action in UCS to perform a Blind transfer and this behavior can be customized on the phone to instead prefer a Consultative transfer as the default action.
- To modify the default transfer type on the phone press the Home key and then navigate to the Settings > Basic > Preferences > Default Transfer Type menu.
The steps below all show a blind transfer as the default option but understand that if the phone’s default setting is changed to consultative then the behavior will be the exact opposite as what what is shown here.
In firmware versions older than 5.5.1 the VVX call transfer behavior has been as follows:
- Simply Tapping the Transfer button will bring up the standard transfer window and perform the default transfer action, (blind in this case)
The text entry field (highlighted in yellow in the edited image above) will either say “Blind transfer to” when Blind is the current action or simply “Transfer to” when Consultative is the current action.
- Alternatively pressing and holding down the Transfer button for one second instead brings up a menu to change the transfer type for this call only.
In the new 5.5.1 firmware this behavior has been changed to following:
- Tapping the Transfer button still triggers the default transfer action on the phone. (Again, Blind on this phone)
- Alternatively pressing and holding down the Transfer button for one second will now trigger the non-default transfer action: in this case Consultative. (Notice that the word Blind does not appear in the text entry field.)
- And if using the long press method is not preferred then by default a new More soft-key has been placed in the upper right-hand corner of the Transfer window. Selecting the More soft-key will brings up the following menu, providing the possible transfer actions for the current call.
By setting the new parameter up.softkey.transferTypeOption.enabled to “0” the More soft-key can be hidden, but the short/long press behavior in 5.5.1 cannot be changed. The identical process shown earlier in the Device Locking section be used to import this setting into a single phone for testing.
In short, with UCS 5.5.1 the call transfer process basically works as this: pressing the Transfer key performs the default transfer type while holding the Transfer key uses the other transfer type. In either method an additional, optional menu is provided to select the desired action without the need to understand the short/long press behavior.
Distribution Lists
Another new feature in UCS 5.5.1 is the ability to support Exchange Distribution Lists (DL). This is something that has been available in the regular clients as well as Lync Phone Edition devices for some time. Basically a user can now search for, save, expand, and place calls to DLs found in the organizational address book.
- To search for and add a distribution list to the contact list for the account registered on the phone simply hit the Home button and select the Search icon.
- Then search for the name of the desired distribution group. The follow example is searching for a group named “Device Accounts”.
- Highlight the result and then select Add to Contacts.
Now that the DL has been added to the phone it can be used to place calls to individual members or create an immediate conference call with all available members.
- From the main screen select More > Contacts > Groups, highlight the saved DL, and then select Expand.
The individual DL members will be displayed on the phone as seen above, which is shown alongside a screen capture of the same DL expanded in the Skype for Business client.
This VVX menu provides options to view the DL details, which displays the SMTP address for the group if applicable, as well as options to either Dial one specific member or to Dial All of them which starts a new conference call on the Skype for Business server.
Manual BToE Pairing
The latest Better Together over Ethernet (BToE) 3.4.0 software introduces a new Manual pairing mode.
It is important to understand that this new option is simply a means to an end and does not really provide any additional capabilities to the VVX with the 5.5.1 release. This new pairing mode is laying the foundation for future support of different tethering scenarios which would no longer be limited to a physical Ethernet uplink directly to the phone.
Auto Pairing
The automatic process is unchanged and remains the default experience on the phone, and is still the recommended method to use.
- On the phone press the Home key and then navigate to the Settings > Features > BToE PC Pairing menu and verify that the Pairing Mode is set to Auto. (If the phone is set to manual then select the Pairing Mode to change it to automatic.)
- Upgrade or install the latest 3.4.0 version of the Polycom BToE Connector Application on the PC.
- Connect the desired Windows PC via wired Ethernet to the PC uplink port on the VVX phone and within a few seconds the phone should automatically be detected and the pair established.
- Return to the BToE PC Pairing menu to verify that the Pairing Status is reported as Paired.
If the Skype for Business logon prompt does not automatically appear on paired, unregistered phone then the sign in process can manually be triggered as shown below.
- Press the Sign In button on the main screen of the phone to bring up the Sign In menu. When the phone is already successfully paired to a PC then the via PC option will be provided.
- Select via PC to trigger the Skype for Business client phone logon prompt to appear on the paired PC. Enter the user’s credentials on the PC to complete the sign-in process.
Manual Pairing
To be clear this new manual pairing mode currently still requires that the PC is physically connected via Ethernet to the phone’s Ethernet uplink port, no differently than all past BToE requirements. (A later release is planned to add the ability to pair to the phone to a PC on the same subnet that is not physically connected to the phone itself.) For now the manual mode would only be used if for some reason automatic pairing was not desirable in an environment.
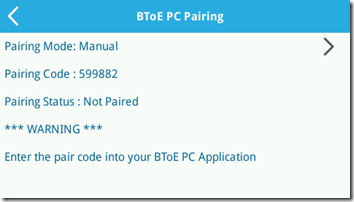
- On the phone press the Home key and then navigate to the Settings > Features > BToE PC Pairing menu and change the Pairing Mode to Manual.
If the phone was already paired using the automatic process then the pairing connection will be broken at this time. Note the inclusion of a new Pairing Code (e.g. 599882) on the screen shown above; this is the information needed on the PC to initiate the pairing process.
- On the PC right-click on the Polycom BToE Connector icon in the system tray and select the Pair with Phone menu option.
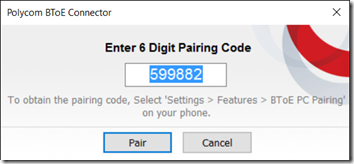
- Enter the pairing code (e.g. 599882) provided by the phone into the Polycom BToE Connector window and then select Pair.
The connector application will report the paired phone details once the connection has been established.
Alternatively the current pairing status can also be found in the phone’s Web Configuration Utility under the BToE PC Pairing section of the Skype for Business Status screen.
The items in this section are generally of more interest to the IT administrators than the end users as these new capabilities in the firmware address subjects like call quality monitoring and managing device diagnostic logs.
Quality of Experience (QoE)
Along with improved media statistic reporting for native QoE monitoring in Lync/SfB the VVX now also supports the in-call QoE feature provided in Skype for Business 2015 server and 2016 clients.
The current status QoE status and configuration can be validated from the phone’s Web Configuration Utility.
- Connect to the phone’s Web Configuration Utility and then navigate to Diagnostics > Skype for Business Status and expanded the Quality of Experience section shown below.
The additional in-call capability is not enabled by default on Skype for Business Server 2015, hence the ‘Disabled’ status reported above. This behavior can currently be controlled only with Skype for Business Server 2015 on-premises deployments.
- From the Skype for Business Management Shell on the Front End server use the Get-CsMediaConfiguration cmdlet to validate the current In Call QoS settings.
Get-CsMediaConfiguration
- Either the following Set-CsMediaConfiguration parameters to enable and/or modify how often the phone will send in-call diagnostic information to the server.
Set-CsMediaConfiguration -EnableInCallQoS $true
Set-CsMediaConfiguration -InCallQoSIntervalSeconds 60
- Reboot the phone and check the Quality of Experience section of the Skype for Business Status window in the Web Configuration Utility to validate that the phone has reflected the new settings.
Whether in-call diagnostics are enabled or not the new 5.5.1 firmware sends more report data to the Monitoring Server than in previous releases. To validate this additional information the following screenshot is an excerpt from the Media Quality Report of a peer-to-peer audio call from a VVX phone running older 5.4.4 firmware (the Caller) and a Skype for Business 2016 Windows client (the Callee).
Notice that some of the MediaLine information above is missing and that the entire Caller Device and Signal Metrics section is blank.
Now compare this to the data shown below from the same call scenario repeated after upgrading the phone to UCS 5.5.1.
Device Log Upload
Not only can users and administrators now trigger the automatic upload of a phone’s device logs to the centralized Lync/SfB device log directory but administrators also have the ability to disable this capability if so desired.
To verify this new behavior which is enabled by default simply trigger an automatic upload directly from the phone using the following instructions.
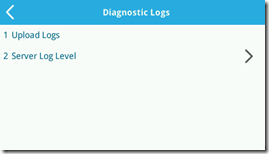
- Press the Home key and then select Settings > Basic > Diagnostic Logs to bring up the following screen. Note the Server Log Level option, which allows the user or administrator to modify the level of log verbosity among 5 different levels.
- Select Upload Logs to trigger the phone to immediately gather its diagnostics logs and then upload them to the registered Lync or SfB server. The messages “Uploading log information” and “Log upload successful” should follow.
This log file will have been uploaded to the default device log folder on the Lync/SfB server’s file store (e.g. <filestore>\1-WebServices-1\DeviceUpdateLogs\Client\CELog) and will be located next to any Lync Phone Edition device logs. The filename format includes the source device’s model name and MAC address. Files uploaded from Lync Phone Edition devices from all vendors will always start with “UCPhone” while the newer generation of qualified phones like the VVX will always start with “3PIP”.
The upload process can also be triggered from the phone’s Web Configuration Utility using the Diagnostics > Upload Logs menu.
As with the other new features this capability can also be disabled to remove the option from the phone’s Basic settings menu as well as from the Web Configuration Utility.
- In the same process as shown earlier in this article create and import a configuration file with the following parameter set to “0”.
feature.logUpload.enabled=“0”
Hide Sign In and Out Options
Borrowing a popular new feature from the Trio 8800 conference phone the VVX phone now supports various combinations of preventing users from signing out and/or in of the phone. There are separate parameters to control the behaviors of either hiding the registration soft-keys on the main screen or disabling the capability on the phone altogether.
Disable Simple Sign In
The parameter softkey.feature.simplifiedSignIn controls the Simple Sign In feature which is enabled by default (“1”). Turning this feature of f will remove the soft-keys for signing in and out of the phone as well as disable this in the web UI. Only the Features settings menu on the phone can then be used to sign the phone in or out of Lync/SfB..
- To disable the Simple Sign In feature set the following configuration parameter to “0”.
softkey.feature.simplifiedSignIn=”0″
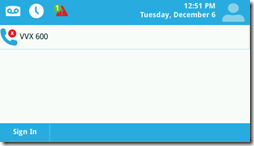
Notice that the Sign In soft-key on an unregistered phone no longer appears. The Sign Out soft-key is also removed on a registered phone.
A user can still sign in or out directly on the phone using the Settings > Features > Skype menu.
The Skype for Business Sign In option is disabled in the Web Configuration Utility.
Hide Sign In & Sign Out
The parameter feature.lync.hideSignInSignOut hides both the Sign In and Sign Out features entirely on the phone from both the main screen and the Features menu, but does not impact the web UI. This parameter is disabled by default (“0”),
- To enable hiding both Sign In and Sign Out capabilities from the phone interface set the following parameter to ‘’1”.
feature.lync.hideSignInSignOut=”1″
As with the previous feature the Sign In and Sign Out soft-key are also missing.
But also removed is the Skype Option under the Features menu, preventing a user from signing in at all directly from the phone.
Yet with this parameter an administrator can still use the Web Configuration Utility to register the phone.
Hide Sign Out Only
The parameter feature.lync.hideSignOut behaves identically to the parameter above except that it only impacts the Sign Out behavior and does not remove the Sign In ability. This parameter is disabled by default (“0”),
- To remove only the Sign Out capability from the phone interface set the following parameter to ‘’1”
feature.lync.hideSignOut=”1″
As seen below a user can still sign in directly from the phone, but once registered the user is not able to sign out of the phone.
Unified Contact Store
The Unified Contact Store (UCS) is a Lync/SfB feature which leverages Exchange Server to store a Lync or SfB user’s SIP contacts in their exchange mailbox instead of the default Lync/SfB SQL location. (To avoid confusion be aware that the abbreviation UCS is used interchangeably for both Microsoft’s Unified Contact Store as well as Polycom’s Unified Communications Software that runs on VVX and Trio phones.)
Traditionally when UCS is enabled the older VVX firmware versions could exhibit issues with reflecting changes on the user’s contact list or favorites. These issues are resolved with the inclusion of support for user accounts which have UCS enabled on them.











Thank you for the great review. This really is THE site for VVX. We just started testing the new firmware and immediately came across an issue with the Expansion Module: http://community.polycom.com/t5/Skype-for-Business/VVX-600-Expansion-Module-problems/m-p/86786/highlight/false I really wish the old behavior was still a choice.
Again, great review!
I have one question about the new Firmware. Polycom mentioned that BTOE and VDI will be supported. Is this the case with this new firmware version? And if not do you know when BTOE will support VDI environments?
regards,
Johan van der Stelt
Vodafone Netherlands.
That is not supported in this release as the PC must still be physically uplinked to the phone. I cannot comment here on if/when VDI scenarios will be supported; you’ll need to contact your official Polycom sales channel for that information.
very nice feature update. still running dropbear_2015.71 though. really should be on dropbear_2016.74 so I can stop asking my security guys for exemptions every time I upgrade.
https://www.tenable.com/plugins/index.php?view=single&id=93650
Jeff, thanks for this update. Your posts have been tremendously helpful as I’ve worked to implement my small SfB Online setup with Polycom VVX 500 phones.
After upgrading my own phone to the new UCS today, I’ve noticed Exchange contacts are taking hours to synchronize, though the calendar seems to have synchronized correctly. Is that normal? Is anyone else seeing this?
Tim, that is not normal and may be the result of something in your organization’s setup. Suggest opening a support ticket to find out the root cause.
Hi Jeff, first thanks a lot for your useful blog.
I’d like to ask you about the new 5.5.1 release :
– is something changed in the registration procedure ?
The DNS queryes behaviour are quite different than the release 5.4.
In less words, my VVX doesn’t register any more after the upgrade to 5.5.1.
I don’t have the lyncdyscoverinternal in my DNS, in order to avoid the need of
internal CA root certificate on the mobile phones.
Have you any tipps for me.
Many thanks in advance for your support
Pietro
The 5.5.1 software now adds support for Lyncdiscover/Lyncdiscoverinternal DNS records to locate the Lync/SfB services, where all older versions of UCS used the legacy SRV/A records only. The new version should still fall-back to SRV/A if the Lyncdiscover records are not there, so open a support ticket to track what is going on here.
Hi Jeff
Recently we upgraded a customer to 5.6.0 on all their VVXs. We had the same problem as Pietro mentioned. We always had LYNCDISCOVER record internally which points to the Reverse Proxy (as the mobility client workaround) but never configured LYNCDISCOVERINTERNAL.
After the upgrade, all the EXT/PIN sign-in failed. Credential sign-in was OK.
After MUCH troubleshooting, I added LYNCDISCOVERINTERNAL pointing to the FE, and bam. All worked.
From what I can see in the VVX logs, it seems that the VVX thinks it’s external (due to LYNCDISCOVER present) and tries to connect to the FE on port 443, instead of 5061. Not sure if this is accurate though.
Anyway, do you have any idea why this situation happened? We have all the DHCP records and all the other DNS records in place. Just LYNCDISCOVERINTERNAL was missing.
Thanks
Hi Jeff
An update on this. We now know of 3 customers with the exact same issue. Probably because we deployed SfB and the handsets for them in the same way.
Your response would be greatly appreciated.
Cheers,
Jason (Insync Technology)
We’ve run into this in a few places where environments are incorrectly configured for Lyncdiscover as a workaround for unmanaged mobile clients. We are looking at a parameter to disable Lyncdiscover and return the phone to using only the legacy SRV/A records so that they can behave differently, if desired. Using Lyncdiscoverinternal correctly as you’ve found is the proper approach, but contact support for details on this new UCS parameter.
Jeff,
Is it possible or even supported to setup an FTP server within a corporate network for a user who has a VVX phone at their home to connect to from the outside?
Thanks in advance!
Yes, but that would require allowing access into your network over a common service port like FTP which is not advisable. Would be better to use a cloud-hosted deployment of the provisioning server that all phones, internal and external, can access more safely.
Hi Jeff
Another great article..
I don’t suppose you have come over a delegate (recieving) on this firmware version at all? I have it working normally with call forwarding and team members but adding one of these firmware versions as a delegate member I get nothing, no notification popup, or ringing at all…
Cheers
Ben
Ben, I haven’t seen that issue myself but I suggest you open a support ticket to track/resolve the problem.
I have a vvx 500 that I am setting up at home. How do I do this without a provisional server. Currently I have it connected to a switch. I do get a dial tone, but it does not receive or make calls. I also have a IP address assigned to the phone but the line is not registered. What do i need to do since I don’t have a sip.
Thanks
Alex, you need a SIP platform to register to in order to use a VoIP phone. You cannot just connect it to an IP network and place telephony calls. The dial-tone you are hearing is simply an audio file played by the phone when it goes off-hook to emulate the experience of a traditional phone.
Jeff – Any idea when this might hit SfB Online? Our VVX 600s are still running 5.4.1.17653 from the summer, and when I look at the Lync Device Update screen, it says the “Version on Server” is “Not Applicable.” Is that what everyone sees?
Dan, I don’t have a date yet but I believe Microsoft is waiting until they have successfully published the Set-UcPhoneConfiguration cmdlet to SfB Online so that tenants can preemptively disable features like Device Lock. Otherwise all online tenants would be automatically pushed to the new version and not be able to prevent the change in user experience triggered by forcing them to define and use a device PIN. Once this cmdlet is functional I’ll update this article to reflect.
Just wanted to close the loop here as Microsoft has recently fixed this in SfB Online. Changes made to the Device Lock parameters online are now correctly reflected via in-band provisioning.
With the change to the BTOE Pairing. I’m not able to “cfg” the feature.btoe.enabled to true at phone boot. Am I missing something (using polycom provisioning server). Thanks for the great articles!!
I haven’t tested this but it’s possible that the parameters names have changed in preparation for the upcoming IP pairing mode.
Hi Jeff,
asking for recommendation from you: are you using the original MSFT-made XML Notepad (the one that was last updated in 2006) or the forked community version (same named, very confusing I know), that gets actively maintaned (found here: http://xmlnotepad.codeplex.com/ or http://www.lovettsoftware.com/downloads/xmlnotepad/xmlnotepadsetup.zip)?
I try to load the polycomConfig.XSD schema definition file from the firmware package so when I edit the 000000000000.cfg I get some hint / help what the values mean. But the old original MSFT xml editor dies if I try to load this 4 MB .xsd file, while the community edition works with that happily.
I’m still using the original version and I’ve never tried loading the schema file.
Thanks for the answer. Just for the record I was slightly wrong, the XSD schema file can be used for the custom config file, and not for the 00000000 template file.
Can you write maybe a small article how to setup the template config (00000000.cfg) if both Trio8800 and VVX phones (using a) the combined SIP.ld or b) using model-specific split firmware) are provisioned on the same provisioning server?
Hi Jeff,
What about D60 pairing with vvx 500 and use with Skype profile? Does this new version fix that and enable us to use Skype account in D60? Thanks for your feedback.
No, using the D60 with a VVX while registered to SfB is not yet supported.
I had some VVX500’s that we upgraded to 5.5.1.11526 using the SFB update process. The updates were successful to the phones. We had issues with the Voicemail button so we rolled them back to the 5.4.5 previous version using the SFB process.
We are now trying to get the updated firmware on test phones (using the SFB update and their MAC addresses).
I see the phones check in at the Devicesupdatelogs but never see them pull the new firmware again. The IIS logs don’t have the GET /RequestHandler showing.
I factory reset one phone and still no luck.
I even deleted the firmware files in the deviceupdatestorage share and then redeployed it.
Any advice on how to get the updates happening again to at least the test phones first?
Thanks in advance.
IF the Test Device process is not working I suggest just using the manual update process from the web management UI on the phone and selecting the desired firmware version from the hosted Polycom server. This is much faster and easier than messing around with the MAC address based Test Device process in the Lync/SfB control panel.
If you prefer using the Test Device process I have steps on how that works for VVX phones (same as LPE devices) here: http://blog.schertz.name/2013/10/updating-polycom-vvx-phones/
Thanks.
The issue is I want to make sure the other 500 phones already rolled out will do the update from the server and not have to be manually done.
The process worked once, but isn’t working again after the rollback and then re-issuing the new firmware.
Would you happen to know if there is a way to remove the Web sign in option from the sign in screen? Looked in the manual and haven’t found anything that looked like it could work for removing that option.
Unfortunately there is no way to hide this option from the sign in menu. This has been a common request lately so I’ll see if I can dig into this some more.
I have two issues with new firmware (three before I managed to disable the automatic device lock).
One is that all users get logged out on all phones after a few days. I have not observed a specific interval and don’t know if this is random or time-based. I have VVX500 and VVX600 phones. Users really complain about this, because it is aggravating when you have to jump on a conference call only to find that the phone logged you out and it takes a couple of minutes (longer for some Mac users) to log in again.I searched the configuration manual for a setting that controls this but did not find one.
Two is that the BToE settings don’t seem to survive logouts. I have to set the phone to enable BToE every single time and then set it to Auto.
I have a phone in the office and one at home and spend a considerable amount of time every week (i.e. 10 minutes or more) just to keep the phones online. I am not happy but I am ok with this, but not everybody else is. I really wish I could switch back to the 4.x firmware, but it seems that whenever I do this, the phones upgrade again shortly after, even with auto-upgrade disabled.
Christian. We are experiencing the same random signout issues. It generally happens overnight and the user comes in next morning and is forced to sign into phone. We are running 5.5.2 with web sign in and have adfs installed onsite with azure multifactor onsite as well. Were you able to determine the cause?
I have this same issue.. every morning 60 phones are signed out and users have to sign back in.
Hi,
Is there anyway you can change the default name search in a VVX UC 5.5.2 from the SIP URI to the TEL URI?
Just we currently have 2 phone systems an SFB and Mitel with most users not being sip enabled, therefore any Search and attempt to ring a non Skype user will fail, without first having to open the contact and selecting the telephone number before dialling.
thanks
I’m not aware of a way to change that as the search behavior is hard-coded.
I am experiencing PIN Authentication to fail on 5.5.1
Log shows oAuth is failing, (400)Failed to Get oAuth Token
Why would PIN sign in trying oAuth?
Hi Jeff, thank you for this great resource. Can you please tell me more on the:
Manual BToE “It is important to understand that this new option is simply a means to an end and does not really provide any additional capabilities to the VVX with the 5.5.1 release. This new pairing mode is laying the foundation for future support of different tethering scenarios which would no longer be limited to a physical Ethernet uplink directly to the phone.”
Does that mean that BToE currently only works with phone that are physically wired to the computer, and not just on the same subnet?
Thank you
Correct.
Hi – firstly great blog!
Secondly I was wondering, since this blog is more than 6 months old, do you perhaps know if Skype for Business Online now has the ability to remove the phone-lock option?
thanks
Yes, the online cmdlets are now functional. You can enable/disable device locking as well as set the PIN length or timeout value.
Can you please elaborate on the details of this. I think this may mean Power Shell, which I am not proficient in. We have Office 365 E3 license. I just got the phone running in the past few hours (VVX411).
I did try adding the config file but got the error.: Internal Server Error. Please try again.
Go to the “Office 365 PowerShell Setup” section in this article to configure Remote PowerShell access to your O365 tenant: http://blog.schertz.name/2017/01/skype-for-business-online-meeting-room-accounts/
And then this older article is still applicable as the same cmdlets for disabling and controlling Device Lock work with SfB Online: http://blog.schertz.name/2012/09/locking-lync-phones/
Once you do the powershell scripts how long does it take to get down to the phones. We are using Polycom VVX410?
The phones should refresh policies within ~8 hours but you can sometimes expedite this by signing out and back into the phone.
Nicely explained and helpful, thanks Jeff
UC-Softwareversion 5.7.0.11768 and BtoE 3.7.0.0 – seems to pair also when there is no direct “link” bewteen the phone and the client
Jeff
I have just created my Polycom provisioning server. My VVX 500 has booted up and updated automatically to the latest firmware. However the new firmware contains the device lock which I need to switch off which I can with the above CFG file. However we have around 100 VVX 500’s in the company. How would I be able to get the Device lock to be disabled on all phones automatically rather than going into the web page configuration of each individual phone and entering the filename?
The parameter you are looking for is: feature.deviceLock.enable=”0″
More details can be found here: https://community.polycom.com/t5/Skype-for-Business/FAQ-How-can-I-disable-the-LYNC-Skype-lock-Policies-for-Polycom/td-p/81284